Introduction

Another two weeks, and here we are – entering our Alpha milestone after being Greenlit! For the team this is a really exciting time as we get to see all of the systems we’ve been prototyping and working on come to fruition after weeks of prototyping and work. Those of you either new to this blog series, new to game development may be wondering what Alpha is.

Alpha is a system complete deliverable, meaning that all the systems that we want in the game are included as a prototype of some sort. While systems might be modified post – alpha, no new systems should be added. Art and sound should have all pipelines complete and the artistic and audio direction of the game should be emerging in-game. The goal of alpha is to have a complete game loop, fully testable, and a robust enough player experience to get reliable QA feedback.

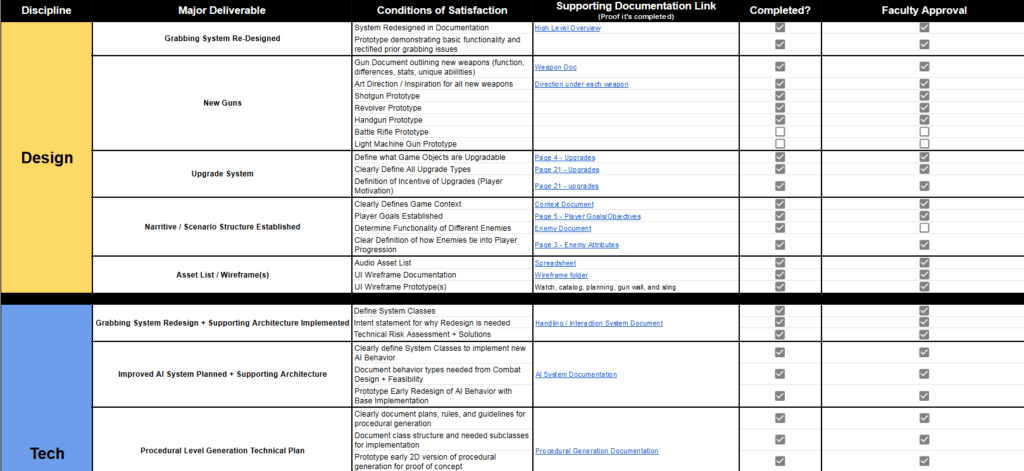
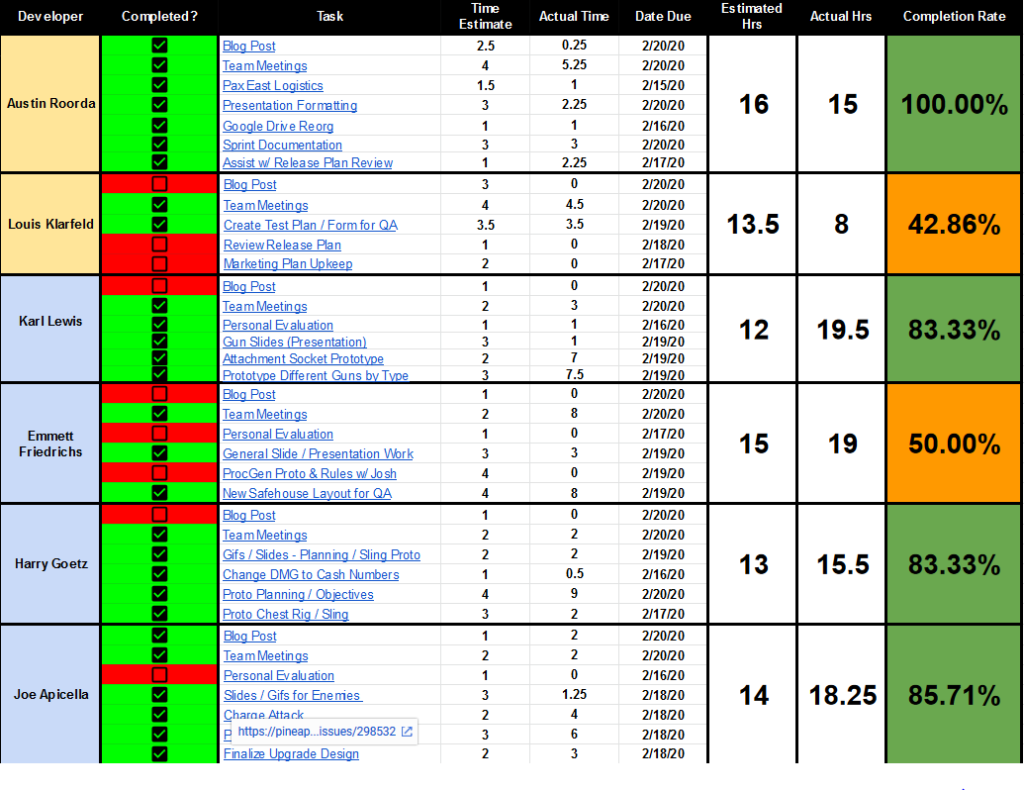
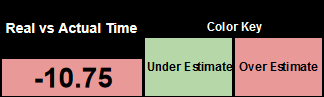
Since the team plans to present our Greenlight criteria before the date that this blog is going live, we’ll have entered our Alpha Milestone by the time you read this! I now want to get into Greenlight a little bit, explaining the new systems and their importance, as well as our super awesome, new and improved task tracking spreadsheets and deliverable matrices! Cool, right?

Let’s jump into it!

Greenlight Criteria (Production)

As mentioned in the last post, here are the Greenlight Criteria that the team has outlined some of the following features / tasks to be what needs to be completed in order to continue development. For Production, our deliverables included:

  •  Applying to Oculus Start for development support
  • 1st Draft Publishing Plan for Release
  • Estimating ESRB / Rating for game
  • File Taxes for Fellow Humans LLC
  • Draft Milestone Planning Document
  • 1st Draft Project Plan
  • Populated Backlog to support future development / milestones

That’s a lot to do, but luckily I have the help of Louis and an extremely capable group of team leads and developers to help get everything done. I want to start with the larger documents that I’ve been focusing on that are going to be the backbone of our production pipeline moving forward.

Let’s start with the Major Milestone Deliverable Document, since it’s a great high-level overview of the project and the planning that I do in order to ensure the project is progressing as it’s supposed to.

This spreadsheet is broken down by discipline for easy viewing by the development team. The first column designates what discipline’s milestone deliverables will be listed in that section, with the next section outlining the major deliverable that the team will be working towards. The Conditions of Satisfaction column outlines what needs to be completed in order for that deliverable to be listed as complete (while also meeting the definition of done outline by the product owner, Emmett). The next column over contains a link to the documentation that can be viewed by the team, management and the faculty to verify that it’s completed.

The last two columns are simple checkboxes that get checked by the team once the deliverable has met all the conditions of satisfaction and definition of done. The faculty will then reference all the supporting documentation and check off the deliverable once it’s been listed as complete by the team. This allows the team to easily track what’s completed and what still needs to be. Easy milestone tracking for all parties involved! While this document is used mostly by the Producers, it’s still a useful doc for the team to use when checking what’s the next major deliverable to take on.

Next up is the Sprint Roadmap, which the team uses much more frequently. This spreadsheet has all the tasks that the team is working on each sprint, as well as a lot of good information that Production can use to track progress on the project. It’s broken down in an easy to comprehend and view format. While it looks like a lot, but it’s really easy to understand once it’s broken down into it’s core parts. Let’s see how this spreadsheet works!

Like the Major Milestone Deliverable Document, this spreadsheet is also broken down by discipline so the team can easily identify their tasks, their progress on those tasks as well as their time estimates and completion rate. Starting with the first column, it displays the name of the developer (color coded to their discipline) so they know where to find their tasks.

Next up is the Completed column. This checkbox can be toggled on and off to indicate completion of a task – and is linked to the Completion Rate at the far end of the sheet which I’ll be getting to in a bit. When a developer moves a task on the task board to complete, they’ll check off the task from this list to show that it’s complete making it easy to see what’s done and what still needs to be done. It’s a lot easier to see what’s completed here than scouring the task board for completed task.

Next is the actual Task Section, where the name of the task that the developer will be working on is listed. I took the liberty of hyperlinking the actual task on the task board to this document so that way I can cross reference the task data from the task board for easy task tracking! 

Next up are the Time Estimate columns – where developers time estimates (as well as their actual time it took to complete the task) are shown to easily identify the difference in time between the estimated and actual time. The times from each respective column (Estimate and Actual time) are added together in the columns to the right of the Due Date column. This helps me see the difference in overall estimated and actual time, which is extremely useful as it allows for me to see if there were any discrepancies between the two times. I’m then able to clearly see and identify potential bottlenecks or issues with that task.

The Due Date column includes the self-imposed due date that the developers set for that task. This date is usually determined by the schedule of each person, but is sometimes affected by external factors such as PAX, which has a hard date that we need to meet. Most of the time, these due dates are scheduled around the other classes and obligations of the developers on the team and come scheduled throughout the week.

Lastly is the Completion Rate column, which calculates the completion rate of the tasks based off of the checkboxes from the Completed column. This helps me identify the tasks that will be rolling over into the next sprint. There are some other awesome project management features that I have built into this document, that I’ll be explaining down below!

Time estimate comparison made easy -

At the bottom of the sheet, there’s a sum function integrated into the footer that adds together the total estimated time, and compares that with the total spent time for that sprint. This visualizes the difference between the two times and allows the next function that I’m going to show to compare the data! Cool, right?

The Average Completion Rate of tasks for the sprint is calculated here by taking the number of tasks that were checked off as complete and dividing that number by the total number of tasks for that sprint. This shows as a percent, with the percent that’s marked as incomplete rolling over to the next sprint. For this example, 79% of tasks were marked as complete meaning that 21% of tasks rolled over into the next sprint.

This formula calculates the total amount of completed tasks. It takes the cell data from the checkboxes and divides the total number by the number of tasks to show a percent. Pretty neat, huh?

In order for the Average Completion Rate to be calculated correctly, each developers completion rate has to be calculated. To do this, I used the SUMPRODUCT function in Google Sheets. The data from each developer’s task checkboxes is added together (complete counts as 1, while incomplete is counted as 0). This is then divided by the total number of tasks for that developer and displayed as a percent. It’s super useful for tracking tasks and I don’t know how I tracked task completion before this!

Looks like our estimates were off by around 11 hours. This could be because of unforsee bugs, or we just didn't expect something to take as long as it did. Either way, we can clearly see the difference!

Finally, we have the Real vs Actual Time header. This header takes the total estimated time and subtracts the actual time that was logged for that sprint. If the actual time logged is under the estimated time, the number will display as a positive number that’s green. This means that our estimates were larger than the actual time that was spent on the tasks.

If the time estimated for the sprint was less than the time that was spent that sprint, that means that our estimates were low and it will be displayed as a negative number that’s red. It makes it easy to visualize if we’re over or under our time estimates – and by how much! Super simple and easy for the whole team to use!

That’s a lot of super awesome production documentation, but we did a lot more than that for Greenlight! Louis and I also worked on the other criteria that I mentioned earlier, and I want to quickly go over the more important deliverables and their significance before showing off the rest of the team’s work.

Oculus Start image
We applied to Oculus Start for additional development support! This program is provided by Oculus to help kickstart developers by providing resources such as headsets - we have few changes to make and we'll be well on our way to getting our development headsets for the team!
OculusESRB Assessment
The application for Oculus Start included filing an IARC survey, giving us a content rating for the game! Based on the content that's already in the game and planned for developement, we averaged a 13+ (Teen) rating in the majority of the markets included in the survey.
alphabacklog
Making sure that our Product Backlog was populated with tasks was critical, as it shows that the team has planned out future development! Here's a screenshot of our Alpha Backlog, ready to be taken on by the development team. If there's any team that can get it done, it's this one!

As you can see, the Louis and myself have been really busy making sure that this project is managed effectively. However, without the rest of the team the game would be nothing but tasks on a task board and spreadsheets. Let’s take a look at what the other developers have been working on since they’ve been cranking out consistently amazing content and deserve all the recognition that they can get!

Greenlight Criteria (Design)

The Design team had a lot of work cut out for Greenlight with our grabbing system needing a total overhaul, new weapons to add, contextual narrative to create and entirely new systems being planned and prototyped. Taking this challenge in stride, the design team delivered with a show of force – with creative solutions, awesome gameplay prototypes and documentation that outline everything clearly. Design’s Greenlight criteria were as follows:

  • Re-Design Grabbing System
  • New Guns Designed / Prototyped
  • Upgrade System Prototyped
  • Narritive / Scenario Structure Established
  • Asset Lists for all Major Systems / Mechanics

Just like with Production, Design had their hands full with all of these deliverables. Let’s check out what they did!

Reworked Grabbing System Prototype

New Grabbing Prototype! Physics now affect the weapon, and the infamous 'grabbing bug' where items would stick to your hands is dead and gone - huzzah!

The first major deliverable that the Design team had to work to overhaul the old grabbing system. The old system had a lot of bugs and issues with how it was build, as we were more or less figuring it out as we went. Now that the team has more experience with Unreal, and more development staff to support a complete system rebuild – we were able to scrap the old and implement the new!

This new system is reactive to physics, meaning that the guns have weight and heft to them when players swing them around. They also react with the environment, meaning that players can brace their gun against the door of the van in order to help reduce recoil, which looks pretty tacti-cool if I do say so myself!

New Prototyped Guns

Your enemies better duck quick, you're going to be spitting a lot of lead down range with this soon!
Do you feel lucky? Well, do you - punk? Also, remember to pull back the toggle stick to cock the hammer after evey shot!
This... is my boomstick! Different ammo types (Slugs, Buckshot) deal damage differently!

We stated in our Mid-Mortem pitch that when moving forward in development we needed guns… lots of guns. Now, we have a small arsenal of weapons prototyped that the player can use! Players can now experiment with a Beretta-inspired starting pistol, a chonky magnum revolver, or a pump action shotgun to deal damage to their enemies! Speaking of enemies, let’s see what new enemy types that we’ve got in the pipeline! 

New Enemy Type Prototypes

Armored cars and enemies take less damage - so fling as much lead as you can at them before they light you up! Aim for unarmored areas to deal more damage!
The prototyped limo is an enemy car that holds a lot of goons and can take lots of damage. Lock and load to take it out, even if it makes you burn all your ammo!
They may look like small cars, but they're actually motorcycles! Small, fast and with practically no health these little buggers get in close to deal damage!

Upgrade System Prototype

Use our socketing system to attach upgrades to your weapon to change how you play and fit your style!

Players can now attach new items to their weapons! In the example to the left, the player is placing a scope on top of their weapon in order to increase their viewing range so they can blast enemies at a distance! This system allows for players to customize their weapon with several different attachments to adjust their weapons to their play style. 

On top of this, these attachments have to be unlocked with cash earned in game through the missions that we’ve designed. Speaking of these missions, let’s take a look at the newly designed scenario and context for Cash Force!

Narrative / Scenario Structure Re-Design

One of the criteria that the faculty brought up to the team was that they wanted to have more context for the player and rationale for why they are engaging in a series of daring, high-octane gun battles while tearing through the streets of a desert city. Initially, we though that the 1970’s was cool, Breaking Bad and the desert scenery was cool, and that guns were cool. That was it. Now that we have a narrative designer on the team, we have the resources to actually put into fleshing out the ‘why‘ and the ‘how‘ of the Cash Force. Let’s quickly go over the context for Cash Force!

Concept Art for the newspaper clippings! They'll let the player know what's going on between blasting bad guys left and right.

The Cash Force is a new gang in town that’s set its sights on taking down The Family – a massive crime syndicate that’s infiltrated nearly all of the city. Initially a police undercover agent, you’ve recently gone rogue and joined up with a new gang, the Cash Force.

The Cash Force is going head to head with The Family, pulling off a series of daring raids to try and bankrupt them, thus ending their stranglehold on the city. Once they’ve gathered $1,000,000 (which is a lot of money for 1970!) they plan on skipping town, and building a new life with their ill gotten gains.

Newspapers like the one pictured to my left are planned to appear before and after missions to give some context to the player about what they’re about to do, and it’s effects on the enemy gang. We want players to feel like their missions have impact and are actually changing the state of The Family, and these snippets of information are a good first step in establishing that narrative context to the player. At least, that ‘s the current plan for what we want to to do with narrative / scenario stuff. If that changes or gets updated, I’ll be sure to explain the changes in another blog post!

Missions are a new addition to the Cash Force safehouse, with players choosing one of three mission types to play to earn cash for the gang!

In order to provide more engaging and exciting gameplay experiences for the player, the Design team designed missions that tie in with the Narrative / Scenario Re-design that was done.  This system uses the Procedural Generation System that the Programming team has been working on, which I’ll break down later. These missions break down into 3 different types:

  • Survival:
    Fight your way through the city streets after escaping from a successful heist. Be careful though, the van is damaged and you have to make it back to the safe house in one piece!
  • Assassination:
    You’ve been given a target, and you need to draw them out. A heist should get their attention, and once they’re coming after get ready for a fight!
  • Fundraising:
    Not your typical fundraising campaign, you’ve been tasked with putting a dent in The Family’s numbers. Every kill you make earns you cash – earn enough to pass the mission!

New Player Facing UI

A bit boxy, not fashionable but totally functional! Here's our groovy watch prototype showing off player health and the cash they've accumulated!

The Design team also wanted to re-work how players received information. Initially, players health was their cash, and the only lose state was losing all their cash which was extremely hard to do. Now, we’ve added in more traditional player health to make the game more difficult. The cash was also displayed behind the player, meaning they would have to look away from the back of the van (where all the action / enemies were) in order to see their status. The watch fixes that and allows for players to stay in the fight while keeping updated on their current status.

Another new addition was the watch UI, where players can see their health value and cash amount on their wrist. This auto-updates whenever a player takes damage, kills an enemy or if the value changes – groovy and useful!

Want to carry your weapons without holding them in your hand? We got that covered with a super snazzy (but currently invisible) sling system!

A major piece of QA feedback that we got from players was that always having to hold onto their items was difficult, and often awkward to do if trying to juggle two guns when attempting to dual wield. The solution we devised was to implement what many other VR FPS games have – a sling system.

The sling system allows for players to attach weapons and magazines to their bodies so they can easily access them when in the heat of battle. Do you want to double your damage by shooting two guns at once? Of course you do! With this new sling system, it makes it easy for players to socket items to themselves for ease of access. 

We also had a lot of asset lists that we needed to create, but I feel like I’ve already shown off enough documentation for one blog post. Take my word for it, they’re there! We also had a lot of wireframes for UI elements that we needed to have, with the watch being the most prominent. Since that’s prototyped already, I figured that I would just show off the most recent version than show a diagram of the wireframe, it’s nicer to look at what we have now!

Now that we’ve covered the Design Greenlight Milestones, we can move onto the Programming team and check out what they’ve been up to! Shout out to all the hard work that the Design team has been putting in over the course of these past five weeks!

Greenlight Criteria (Programming)

The Programming team also had a tall order for Greenlight, with their criteria mostly focusing on fleshing out back end systems that we outlined in the first semester of development. I’ll be perfectly honest, a lot of what they do is create alien technology that’s beyond my comprehension, but it’s super awesome regardless! Their Major Deliverables for Greenlight include:

  • Grabbing System Rework + Supporting Architecture Implemented
  • Improved AI System Prototype + Supporting Architecture 
  • Procedural Level Generation Technical Plan
  • Gun Manager + Supporting Architecture

I’ll be breaking down what all this means down below, starting with the Grabbing System Rework that we covered already a bit within the Design section. Let’s see how the Programming team was able to rework this system with the Design team!

Grabbing System Rework

As I mentioned earlier in the Design post, the old grabbing system had a lot of issues and needed to be rebuilt if we were going to continue with our development. The Programming team worked closely with the Design team to create the new system that I outlined in the Design section of this post, and because I already spoke on that system already, I’m going to move on to the next piece of Greenlight criteria that the Programming team needed to touch upon, the AI!

Improved AI System Prototype

The AI of Cash Force play a huge role in shaping the gameplay experience for the player. Last semester, our AI were pretty dumb, crashing into each other and the player van with reckless abandon – causing them to pile up and no longer chase the player. This isn’t very fun to engage with, since the player is constantly on the move meaning that when the enemies would crash players would have to wait until they passed the next spawn location before being able to shoot bad guys again, boring! Let’s see what the new AI is looking like!

Instead of a demolition derby following the player, we have an average day at rush hour! Sure, they still drive like maniacs, but who wouldn't at 5 o'clock? (or if some gangsters just robbed you blind!)

Instead of smashing into each other and sending cars flying in every direction, the new AI has access to more information related to turning and stopping. You can see in the gif to the left that they’re still following the node path that we created last semester, this time they’re doing it like they passed drivers ed!

This new AI system makes for more compelling chases since the enemies can focus on the player and actually be a threat by following and engaging the player, rather than something to laugh at while testing.

Procedural Generation Prototype

Currently, the map that we have has been hand-made by Emmett, our Level Designer. While there’s nothing wrong with the current level (we actually like it a lot!) – we want to give players a new experience every time they play by procedurally  generating a map for them every time they load up a mission, as discussed above in the Design section about Missions. Josh Grazda (Our Lead Programmer) goes into a lot more detail than I will considering the fact that he made this system. Check out his Blog Post by clicking the button down below!

Josh made the gif to look like our slides, so that's why we're looking groovy! Also, this is a great breakdown of the ProcGen system without getting too technical!

The super simple breakdown of this system is that a map is randomly generated with roads and places for buildings, with the exit for the map always being placed at the bottom of the map.

Josh’s insane alien technology that he created makes a route from the start to the exit, while sprinkling in areas for enemies or events to be spawned. Depending on the missions, this could be enemy spawns for the Fundraising and Survival Missions, or the Boss Fight for Assassination Missions!


This system allows for players to have a unique experience every time they play, even if they’ve played the same game mode hundreds of times – the map, spawn locations and other events will be in different places and scale based on difficulty, with easier missions having less enemies, and a shorter runtime than longer missions.

Gun Manager

The Gun Manager system was made so that the Design team could easily tweak weapon data values once they were prototyped. Without getting too technical and into the code that was written, this system is super useful since it allows for easy iteration on weapons, which the Design team will be using a lot moving forward with new weapon implementation. In the words of Michael Zheng (the madman who created this system) “The gun data manager is an instance of a class that is outside of unreal. The manager stores weapon data and can be accessed anywhere by any object. The manager can also store data into a file and be passed around”. Basically, this data makes the guns go boom and can make any gun we want go boom as much or as little as we want.

I’m not sure about you, but my brain hurts from reviewing all of that code stuff! The whole Programming team possesses such big brain energy, and operates on a whole other level than myself. I think I’ll stick to spreadsheets and task tracking! Regardless of my comprehension (or lack thereof) of what they’re doing – the work they’ve put in towards this deliverable has been invaluable to the development of Cash Force’s systems and is the backbone of our development pipeline moving forwards.

Greenlight Criteria (Art)

Let’s take a look at something a little less technical and a lot more aesthetic – the art! The Art team has been working hard to make sure that Adam’s dream to make the most aesthetic game to come out of Champlain College’s Game Studio comes true by creating some really awesome art assets! Let’s take a look at what they had to deliver for Greenlight:

  • Implement New Lighting System / Finalize Art Style
  • Concept Characters
  • Create / Stylize VFX

Let’s see how each of these Deliverables impacted the look of Cash Force!

Lighting System Implementation / Finalize Art Style

Lighting on everything now works, and our game looks even better than it did before!

The Art team overhauled the Lighting System, making the game have actual contrast between items, as well as shadows. The lighting system is fully customizable as well, meaning that we can change how the game looks easily!

Aside from looking great – this also ties into finalizing the art style, as we wanted the game to have more depth and seem less saturated and flat.

Groovy, and most importantly, less orange!

Here’s the updated (and possibly finalized) color palette for Cash Force. Due to an overwhelming amount of QA feedback stating ‘The game is Orange’ – the Art team has changed around some of the colors to make the game less orange.

While this color palette is subject to further change based on QA feedback or new assets being implemented into the game, we’re currently working with these colors in the game.

Character Concepting

Currently, the enemies of Cash Force are the default Unreal character model that’s bright red to show that you should probably shoot them. Wanting to maintain the same level of visibility, Kaylee (our character artist) whipped up some amazing enemy character concepts! Let’s start with the initial concepts that were created, as shown below!

A group of 7 goons, groovy but they'll need be cut down (and not just by machine gun fire). It's a lot of work to model, rig and animate one character, let alone 7!
Here's a slightly smaller sample size of 6 - so we still have some axing left do to. It's a shame too, they all look wicked fresh!

While those concepts were close to hitting the mark, some slight tweaks were made to their design. All of the characters were given overalls or another bright article of clothing in order for players to make them out at a distance. We have 4 enemies total, 2 males and 2 females.  Take a look at the finalized enemy concepts down below!

Here's the first female enemy. Nice bell-bottoms, my mom would think they're really rad!
Here's the second female enemy. Also rocking bell bottoms and floofy hair, we'll have to make sure that isn't included in her hitbox!
Here's the first male enemy. Looking good, well except for the mullet. Maybe it's better that we're taking him out so his kids don't have to look at embarassing photos!
Here's the second male enemy. Rocking both an afro and mutton chops, this guy really likes to let us know that he needs a lot of shaving cream and shampoo.
Here's the work in progress rig that Nick has been working on!

We also onboarded a freelancer to help create our animation rig that our character model will be attached to. This rig will be used to animate the enemies to, well – do bad guy stuff like lean out of their cars and shoot at you, steer the car, and ragdoll when you shoot them. Check out the rig Nick (our Rigging freelancer) made to the left!

There’s just a few small tweaks that need to be made to the rig before we can start using it, but once it’s ready we’ll be able to start animating our bad guys!

Create / Stylize VFX

Considering how much gunfire and explosions are in Cash Force, we wanted to really make sure that players felt satisfied when they took out an enemy or blew up a car. Making sure that all of this player feedback feels good to the player is important – but it’s more important since all of this feedback is actually information for the player. It conveys information that can let the player know if a bullet connected with an enemy, killed an enemy, damaged a vehicle or blew it up. All of this information is critical to the player, and Jonah made sure to create some epic VFX!

Not only is the muzzle flash awesome, but check out the sparks! Details like that really make the effect for me.

I would argue that the VFX that players will be seeing the most would be the muzzle flash of their weapon considering they’ll be using it every time they play.

The new flash has a flower pattern that personally reminds me of the AR33 from Goldeneye for the N64. It’s powerful looking, but not distracting to players who are aiming down the sights of the weapons. I think it looks awesome!

Is shooting people family friendly? Absolutley not, but when your enemies bleed flowers I guess it's okay!

Now, what happens when you shoot an enemy? In most traditional FPS games they’ll let out a scream, blood will spurt out and you’ll think nothing of it. That’s not the case in Cash Force, since all of our enemies emit floral patterns when shot!

Partly due to the team thinking it was hilarious, partly due to it fitting the 1970’s theme and partly due to wanting to reach a T-Rating in our IARC content evaluation, enemies spurt out lots of groovy particles when shot. Blood is overrated anyways!

In the future, we plan on throwing some cash particle effects in there too!

Must be hard to drive considering how thick the smoke is!

Shooting people is one thing (that nobody should ever do outside of playing video games) – but how about when you shoot at a vehicle in Cash Force? We wanted clearer damage indicators for the player, since before these VFX players would just have to take a guess at how damaged the enemy cars were since there was no indicator.

Now, when enemy vehicles take damage they start to emit smoke! We wanted players to have a clear indication of how much damage they had dealt to a car, so we figured that there was no clearer indication of this than having a massive, billowing cloud of smoke pour out from under the hood.

This smoke can also be made darker by using the new lighting system, which can be tied into how much damage has been dealt making for light smoke when the car has been slightly damaged, and dark smoke when the car is ready to blow!

It'll buff right out! Well, maybe not...

Finally, the VFX you’ve probably been waiting for, the explosion! When a car takes enough damage, it’ll explode in a massive fireball taking out any of the surviving passengers and completely disabling that vehicle. It takes a lot of ammo to take out a car just by shooting it, so aim for the driver and take them out to cause the same effect!

This effect can also be used for potential explosive weapons if we decided to move forward with them in the future.

The art team has also on-boarded an environment artist named Brynn, who is a first year here at Champlain College. Brynn has been working with Adam to create new environment assets such as buildings to help spice up the environments and make them feel more real and believable. Here’s some of his modeled buildings that we’ll be applying textures to and putting into the game!

Here's a new building to spice up the skyline!
Parking Garage
A parking garage, hopefully parking here isn't as expensive as it is here in Burlington!

As you can see from all of the assets on display here, the Art team has been working super hard on making this game look as good as it can. Moving into Alpha we have a lot more VFX, guns, character modeling and animation work to be done, so I know the Art team will be busy well into our later milestones. Looking fantastic everyone!

Final Thoughts!

The Cash Force team has been working incredibly hard over the course of the past 5 weeks to get all of these Greenlight criteria completed, and it wasn’t for nothing either! The team presented and were greenlit thanks in no small part to the awesome work they’ve done – as well as their justification for it. A job well done to the entire team for having a great work ethic and working hard to create the foundation that we’ll be building on for the next two months.

If you’d like to take a look at the Greenlight presentation that the team presented, click the button down below to take a look at it! Some context will be missing as we verbally described a few of the slides, but if you read this post all the way through before opening the presentation than most of it should make sense to you!

Now that we’re through Greenlight, we enter the Alpha Milestone which I outlined at the beginning of this post. In two weeks, I’ll be updating you all on the team’s progress towards meeting their Alpha Deliverable criteria and showing off even more new content that’ll be in the build, as well as reviewing our time at PAX East in Boston! Stay tuned for that, and thanks for reading this all the way through! Feel free to reach out in the comment section of this blog on Twitter if you have any questions or feedback!

Talk to you next time!
~Austin